Add
Description
This command has two options: one to add a test project to the main project and another option to add automatic code documentation capability to the project.
Example to add both tests and docs to the project:
pasc add --tests --docs
This command must be run from the current directory of a FreePascal/Lazarus project to work. Here's how each option works:
--tests
Use the project from the previous page quickstart as a base to try out the features of this page.
To add a test project to the project, do the following: with the project folder open on vscode, open a terminal session and from the project root execute the following command:
pasc add --tests
This command will add a test project by creating a subfolder named tests and adding a basic test project template with some example cases. We can see that our project structure has been modified a bit to something like this:
./HelloWorld
├───.vscode
│   ├───launch.json
│   └───tasks.json
├───src
├───tests
│   ├───TestHelloWorld.lpi
│   ├───TestHelloWorld.lpr
│   └───TestCaseHelloWorld.pas
├───.gitignore
├───boss-lock.json
├───boss.json
├───helloWorld.lpi
└───helloWorld.lpr
Open TestCaseHelloWorld.pas file, there are three tests in this unit, one test that passes, one that fails and one that causes a memory leak.
These tests are like this to demonstrate how the pasc test report looks like. The idea behind a different report is to provide a quick identification of tests that failed for some reason. And this is done through the use of colors and alignment and with the consolidation of test information and possible memory leaks in a single report.
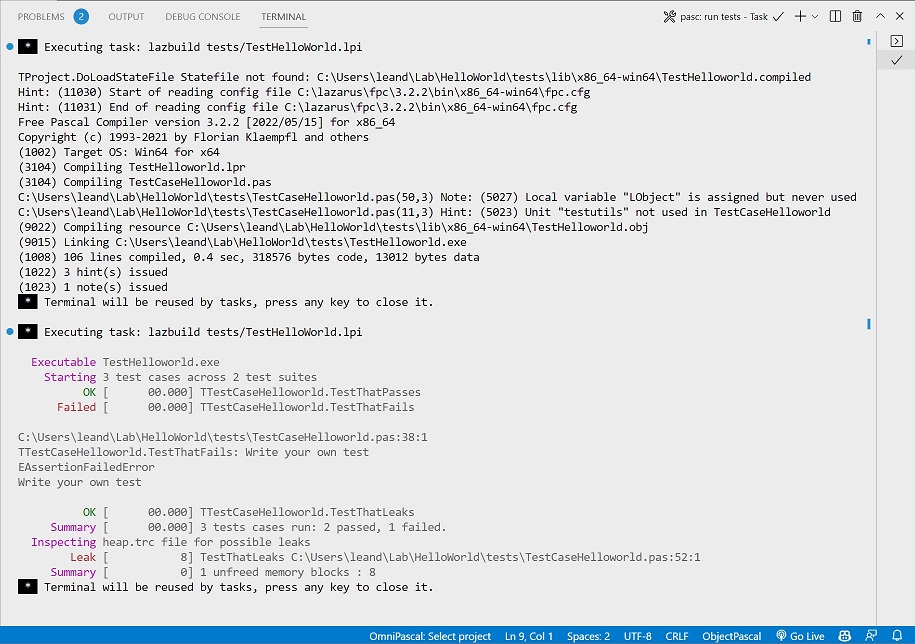
Now our tests task can be run with a test project available, you can now run a vscode task "pasc: run tests", it depends on "lazbuild: build tests". You should see an output similar to this:

In this image we have a first block that is the output of the pascal compiler and in the second block we have the output generated by pasc with the summary of the execution of all tests. We can see that there is a test failing: TTestCaseHelloWorld.TestThatFails, you can ctrl + click on the file name to check the respective line for that test. Another problem case is a leak included on purpose in TTestCaseHelloWorld.TestThatLeaks, you can also ctrl + click on the file to locate the line of code with the problem.
Try to fix the problems by commenting out the line of code from the test that fails and uncommenting the LObject.Free line from the test that leaks. Run the tests again and you will see something like the output below:

We can see that all tests are passing now. Therefore, consolidating the test results with a summary of possible leaks gives us productivity to address problems as soon as they become visible. There are more features that can be combined with the pasc test command such as the watch command.
--docs
Using the same project run the following command to add features that aim to facilitate the creation of project documentation:
pasc add --docs
This command will add a "docs" subfolder containing resources to help generate a site containing the project's code documentation. Check the folder structure below:
./HelloWorld
├───.vscode
│   ├───launch.json
│   └───tasks.json
├───docs
│   └───generate
│       ├───build.ps1
│       ├───custom.css
│       ├───introduction.txt
│       └───quickstart.txt
├───src
├───tests
│   ├───TestHelloWorld.lpi
│   ├───TestHelloWorld.lpr
│   └───TestCaseHelloWorld.pas
├───.gitignore
├───boss-lock.json
├───boss.json
├───helloWorld.lpi
└───helloWorld.lpr
Inside the docs folder, a generate folder was created containing inputs to generate the project documentation. It is required that pasdoc must be installed and accessible through the environment path. To generate the documentation, just run the "pasdoc: build documentation" task or the following command in the project's root folder:
docs/generate/build.ps1
This script will call the pasdoc which in turn will populate the docs folder with the pages that compose the site with the documentation. This site can be published, for example, using the github pages feature by choosing the docs folder as the documentation source.
If you have the vscode extension Live Server you can just right click with the mouse on file index.html and choose "Open with live server", this will make the browser display the documentation site. Check that the style css used is the same as pasc itself, which just uses a customized version of the style that comes with pasdoc. Feel free to change custom.css file.
There are two files in the generate folder: introduction.txt which contains the project overview and was built using the tags provided by pasdoc, and the quickstart.txt file which, as its name says, aims to transmit to the user a quick way to start use the project. These files are informed to pasdoc, inside the script docs/generate/build.ps1 through specific options, any new file must be informed through the option "–additional". Another important point of the script is the Set-NavigationMenuOrder function responsible for organizing the order of menu items in all documentation files. This is done so that additional menu items always appear before the reference documentation (code documentation).
Next Build Command |
|---|
Generated by PasDoc 0.16.0.